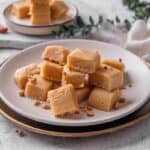
Peanut Butter Fudge Recipe
Old-fashioned fudge made from vegan ingredients–plant based butter, organic powdered sugar, floral vanilla, and creamy peanut butter make for one creamy treat!
Servings 24 pieces
Ingredients
- ½ cup vegan butter
- ½ cup creamy peanut butter
- 1 tsp salt
- 1 tsp vanilla extract
- 2 cups organic powdered sugar
- Crushed peanuts, optional for garnish
Instructions
- In a large microwave-safe bowl, combine the vegan butter and creamy peanut butter.
- Microwave until the butter is melted, about 2 minutes. Whisk the mixture until smooth and well combined.
- Add the salt and vanilla extract, then gradually add the powdered sugar.
- Stir the mixture until it becomes a thick and smooth batter, almost like a dough.
- Transfer the fudge mixture to a parchment paper-lined baking dish and smooth the top with a spatula. Refrigerate for 4 hours.
- Slice the fudge in a 6x4 grid to create 24 pieces, or cut them into any sized pieces you like.
- Sprinkle the crushed peanuts over the top of your fudge squares if you like, and enjoy! Or, wrap them up in wax paper for a different presentation.
Video
Notes
Ingredients
- There are many amazing vegan butter options out there! I like Trader Joe's Vegan Buttery Spread or Melt Organic Butter Sticks for recipes like this, but you can use any brand that is your favorite.
- Using creamy peanut butter is essential here as it gives the fudge a thick and smooth texture. Chunky peanut butter will have an undesirable texture as well as make your fudge difficult to cut, so best to avoid using it here.
- You may need to add more than 1 tsp of salt if your peanut butter is an unsalted variety.
- Using powdered sugar as opposed to granulated sugar is also crucial to the overall texture of the fudge, as regular granulated sugar will leave the fudge gritty. Organic powdered sugar is vegan.
Tips
- Cutting fudge can be tricky–it’s sticky stuff! To make things go a little smoother, dip your knife in hot water to warm the blade, dry it off, and then use it to cut the fudge. If it starts getting stuck again, rewarm and dry the blade as needed.
- Lining your baking pan is important as it makes the fudge much easier to remove after it has set. I like to use parchment paper for this purpose, but a sheet of plastic wrap would work too. Whichever material you choose, be sure to leave a few inches of overhang so that you have something to grab a hold of when it comes time to lift the block of fudge out of the dish.
Storage
- Store your fudge in an airtight container at room temperature. If you are stacking your fudge in layers, be sure to place sheets of parchment or wax paper in between to prevent sticking. If you are in hot weather, you might want to refrigerate the fudge to prevent it from getting too soft.
- Freeze your fudge in a freezer-friendly airtight container or freezer bag for up to 3 months. To Thaw: simply leave the fudge at room temperature until softened and enjoy!